

Monday, November 11, 2013
Kiln gods

Thursday, November 7, 2013
Show Preppin'
I've been hard at work prepping for two upcoming shows.
.jpg) |
| Sgraffito Plates and Platters |
Sunday, July 28, 2013
Teacher Appreciation Ceramic Project
 |
| "Thank you for helping us grow!" |
This past year, my youngest child had a great teacher. It was her first year teaching, which had me feeling a little apprehensive at first. She was replacing a wonderful teacher who retired unexpectedly, so she had BIG shoes to fill. Fortunately, for us all, she was wonderful! I was so impressed with how well she managed teaching a new curriculum and even more so, how she really taught the kids so much beyond the information in their textbooks. She has great maturity and insight for someone so young and new to teaching.
At the end of the year, I was reminded of this when I compiled a photo book for her and had the kids answer a few questions about their year with her. Among all the funny, sweet and thoughtful answers, there were a few that really stuck with me.
When asked "What is the most important thing you learned in Mrs. Lockin’s class?", one child responded, "I learned from her that when you have a problem with someone you should go directly to that person to talk about it, and not talk about it to everyone else first. I learned it’s better if you are nervous to talk to the person to take a friend along with you for support. She taught me it’s better to talk a problem out with someone than to just talk to everyone else and get madder and madder."
Wow.
As a parent, hearing a child say something like that speaks volumes. She wasn't the only student saying things like that, either. These days there is so often an over-emphasis on test scores, common core state standards, etc... It was just so refreshing to hear what these kids in her class had to say. They had learned some life lessons - some that people my age haven't even learned yet. Don't get me wrong, there were a lot of answers like "Multiplying fractions, double digit division, etc..." Clearly there was a lot of learning going on in her classroom - on all levels.
So all that being said, I was extra motivated to coordinate something special for this teacher in appreciation for all that she did for our kids this year. While she was at a year end teacher appreciation lunch, we secretly made leaves for a tree out of clay. We cut the leaves out with a leaf shaped cookie cutter. Then the kids carved their names into one leaf and decortated extra leaves with leaf patterns. The kids used a dull pencil to carve into the clay.
+-+Teacher+appreciation+project+2+-+Mrs.+Lockin.jpg) |
| The leaves were cut out of clay using a leaf shaped cookie cutter. |
It was a fun and relatively easy project that the kids enjoyed doing. I think she was very touched when it was given to her in appreciation for all she did during the school year.
Saturday, April 27, 2013
Mother's Day Gift Pendants - Classroom Project

This week I spent the day with a long time friend, Joanne. We had a wonderful time enjoying the sunshine and each other's company. She said she was willing to help me out with anything I had going on with Shoot the Moon, so I took her up on it. She jumped right in and helped me make up some samples to use for a Mother's Day project for a 4th grade class.
 |
| Porcelain pendanat samples before bisque firing. |
I have various hole cutting tools, but I've found straws really work the best for these kinds of projects. I like them because they always leave the best holes in wet clay - you get a really clean edge on both the front and the back, which I don't always get with a metal tool. It's particularly important to have a smooth clean edge on the back of these, since they might be laying against skin when they are worn as a pendant.
 |
| Completed pendant with black cord and silver bead |

These will be a gift that will have a "life" - which is one of the things I really love about making clay projects with kids. Mom's will keep these pendants and hopefully wear them for a long time.
 |
| 4th Grade Finished Mother's Day Gifts |
Update: I've heard for many of the mom's that received these pendants and they LOVE them. It really was a simple project that had great results.
Tuesday, December 4, 2012
Nothin' Like a Little Heat...
There is nothing like a "little" heat to bring out the color in ceramics. Glazes are amazing. I always marvel how a ceramic piece is transformed once it's been glazed and fired.
To be completely honest, "little" isn't really little - these were fired to 2232* F.
Here is a BEFORE image of a group of bowls:

Here is a AFTER image of the same group of bowls:

To be completely honest, "little" isn't really little - these were fired to 2232* F.
Here is a BEFORE image of a group of bowls:

Here is a AFTER image of the same group of bowls:

AMAZING! Don't you agree?!?
Friday, November 30, 2012
Happy Valley Craft Fair
I'll be selling pottery on Saturday 12/1/2012 at the
Happy Valley Grange in Redmond, Washington from 10 AM - 5 PM.
Come on by if you are in the area. I've got lots of new items and some fun sgraffito ornaments.

Tuesday, November 20, 2012

Saturday, November 10, 2012
Matcha Green Tea
.JPG) |
| Matcha tea in a Japanese style tea bowl-waiting for the water to cool to 175* F before adding it to the tea and whisking it up. |
.JPG) |
| I've been making Japanese tea bowls for matcha tea. |
To make matcha measure a heaping teaspoon of ground matcha through a small fine wire mesh sieve to break up clumps. Sieve it directly in the ceramic tea bowl and add hot water (approximately 175°F). Whisk the mixture to a uniform consistency, using a bamboo whisk called a chasen. Whisk it until there fine bubbles form on the top of the tea. Make sure there are no lumps left in the liquid and no ground tea should remain on the sides of the bowl. Don't linger - drink it quickly before the matcha settles too much. It will make you feel amazing.
 |
| A "chasen" - a bamboo whisk |
.JPG) |
| I drank it up so fast, I almost forgot to take a photo of it before it was gone. Yum! We get our organic matcha tea from Remedy Teas on Capital Hill in Seattle. They sell the tea and supplies online and in their cafe - store. They have a great offering of items that are made with matcha. If you can, stop by and sit a spell. |
Monday, October 29, 2012
Studio Pal
I've been spending every spare moment working on inventory, samples and some custom orders. I wish there were more hours in the day - as I'm working into the wee hours of the morning after everyone has gone to bed. *yawn* Thankfully my canine friend, Sequoia Boya, has been my studio pal.
.JPG) |
| Waiting for glaze |
 |
| My sweet boy - Sequoia |
Thursday, October 25, 2012
The BUSY season
I've been working hard on custom orders, Etsy shop inventory, holiday craft show inventory and a retail opportunity. It's been fun and BUSY!
.JPG) |
| soap dishes and sponge holders in progress |
.JPG) |
| A kiln full of samples waiting to be glazed |
Friday, October 12, 2012
Latest Creations in Studio Shoes
 |
| Bowls, bowls, bowls! |

Clay is messy. There is no way around it. I have an old comfortable pair of Keen sandals that I wear in my studio while I work. Over the years, they've acquired their own unique natural patina of clay and glaze splatter. A sure sign of the onset of fall and cooler weather around here is my transition from sandals to socks with sandals. The look is a definite "Glamour Don't"!

Friday, September 21, 2012
What's in a Name?
One of my kids had to do a little speech today on the meaning of his name. When I look back on how we chose his name, it all seems unplanned to me. We went to the hospital with three boys names (Jasper, Jackson or Finn) and two girls names (Zoe or Julia) picked out. He came home with a completely different name with meanings that fits him so well now that we really know him: willful, desiring, protective, sheilding, taking someone else's place.

It got me thinking about my given name Melanie Susan Tyler - meaning black lily tile maker. Hmmm. So fitting for me these days. Certainly my parents didn't plan that. I remember when I learned that my first name meant black. It never made much sense to me. Now that I think about it at this point in my life, I realize I've made tiles in many different colors, but I'm always drawn back to black as the base color for me to carve into. Perhaps this urge has been with me since I was born.
What does your name mean? Does it "fit"?

It got me thinking about my given name Melanie Susan Tyler - meaning black lily tile maker. Hmmm. So fitting for me these days. Certainly my parents didn't plan that. I remember when I learned that my first name meant black. It never made much sense to me. Now that I think about it at this point in my life, I realize I've made tiles in many different colors, but I'm always drawn back to black as the base color for me to carve into. Perhaps this urge has been with me since I was born.
What does your name mean? Does it "fit"?
Monday, September 10, 2012
Firing - the magic of ceramics - a potter's "test kitchen"
I have a SKUTT 1227 Kiln. It's an electric Cone 8 kiln with an electronic kiln controller that I typically fire to Cone 6.
In the past, I always have done test firings to reach Cone 6 at medium speed with no hold time. After attending NCECA last spring in Seattle, I was inspired to finally start experimenting with my kiln's Ramp/Hold features. I saw some amazing before and after results with glazes when controlled heating and cooling was used.
I read an interesting article called "Glaze is Not a Rock by Carol Marians". Read it for yourself to better understand what is happening to the molecules on the glazes as they are being heated up and then cooled. She uses a great girls on a train analogy that I found helpful.
Marians wrote another great article about cooling in Ceramic Arts Daily called "The Many Faces of Iron: An Exploration in Cooling". It has some great images that show how varied a glaze can appear when cooled at different rates.
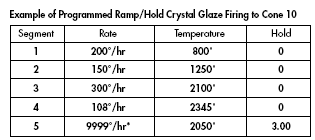
The kiln's Ramp/Hold mode allows people to design their own firing programs in different segments. Each segment can include temperature rate, end temperature and holding time.
I'm still working on testing out my glaze combinations with different Ramp and Hold schedules. Every potter's schedules will vary depending on the clay body and glazes they are using.
Glaze firing clay is kind of like baking a cake. When you make a cake, you can bake it at 450 for 10 minutes or 350 for 22 mintues. In both cases, the cake will be "done", but the results will be very different. It's the same with glazes. Using different firing schedules can product incredibly varied results in the glaze finishes.
For me, this is the fun part. It's kind of like working in a test kitchen with different recipes. Only you can't eat the results - perhaps just eat off of them.
In the past, I always have done test firings to reach Cone 6 at medium speed with no hold time. After attending NCECA last spring in Seattle, I was inspired to finally start experimenting with my kiln's Ramp/Hold features. I saw some amazing before and after results with glazes when controlled heating and cooling was used.
I read an interesting article called "Glaze is Not a Rock by Carol Marians". Read it for yourself to better understand what is happening to the molecules on the glazes as they are being heated up and then cooled. She uses a great girls on a train analogy that I found helpful.
Marians wrote another great article about cooling in Ceramic Arts Daily called "The Many Faces of Iron: An Exploration in Cooling". It has some great images that show how varied a glaze can appear when cooled at different rates.
The kiln's Ramp/Hold mode allows people to design their own firing programs in different segments. Each segment can include temperature rate, end temperature and holding time.
I'm still working on testing out my glaze combinations with different Ramp and Hold schedules. Every potter's schedules will vary depending on the clay body and glazes they are using.
Glaze firing clay is kind of like baking a cake. When you make a cake, you can bake it at 450 for 10 minutes or 350 for 22 mintues. In both cases, the cake will be "done", but the results will be very different. It's the same with glazes. Using different firing schedules can product incredibly varied results in the glaze finishes.
For me, this is the fun part. It's kind of like working in a test kitchen with different recipes. Only you can't eat the results - perhaps just eat off of them.
 |
Example of a Controlled Cooling Schedule.
*Note that 9999 on a Skutt Kiln program represents the default for the maximum heating or cooling rate. This will vary depending on the kiln, how packed the load is, the air circulation and the room temperature.
I find that in the dead of winter or peak heat of the summer heating and cooling rates can really vary for me, as my studio space doesn't have a heating or cooling system.
|
Monday, September 3, 2012
Shrinkage
I'm talking about clay shrinkage, not the George Costanza "I was in the pool" type of shrinkage. (One of those words that will likely live in pop culture for the generation of people who tuned in to Seinfeld every week.)
In fact, the shrinkage that occurs with clay firing happens because of extreme heat, not cold. When clay is fired, the moisture is removed from the clay making it hard. The higher the temperature the clay is fired to, the stronger it becomes. Each piece is fired twice, one time for bisquing and then again after the glaze is applied. Most of my finished pieces are fired to Cone 6 on the Pyrometric Cone Scale which is about 2232* F. Yes, that's HOT!
Every clay body has a different shrink rate. Most of the clay bodies I work with have about a 12% shrink rate. While that might not sound like a lot, it sometimes is surprising how much it really is once a piece is finished.
I remember when I first started throwing and I'd make something that seemed really tall or big. It was so disappointing to see the pieces after firing when they'd shrunk up so much. Something that had seemed so tall and big at first, didn't seem that way in the end.
I use a product called a "shrink rule" to help me cope with clay shrinkage. Often customers want a specifically sized finished piece. The shrink ruler helps eliminate a lot of the guess work that would normally occur when trying to estimate the size of a finished piece after shrinkage (assuming you know the shrink rate of the clay body you are using).
Next time you see a really large piece of pottery - think about how much bigger it was when it was created. It'll seem even more impressive!
In fact, the shrinkage that occurs with clay firing happens because of extreme heat, not cold. When clay is fired, the moisture is removed from the clay making it hard. The higher the temperature the clay is fired to, the stronger it becomes. Each piece is fired twice, one time for bisquing and then again after the glaze is applied. Most of my finished pieces are fired to Cone 6 on the Pyrometric Cone Scale which is about 2232* F. Yes, that's HOT!
Every clay body has a different shrink rate. Most of the clay bodies I work with have about a 12% shrink rate. While that might not sound like a lot, it sometimes is surprising how much it really is once a piece is finished.
 |
| A before and after image of two mugs to show 12% clay shrinkage. The mug on the left is completed. The mug on the right is leather hard -it has not been fired at all yet. Once the mug on the right is fired twice, it will be the same size as the mug on the left. |
I use a product called a "shrink rule" to help me cope with clay shrinkage. Often customers want a specifically sized finished piece. The shrink ruler helps eliminate a lot of the guess work that would normally occur when trying to estimate the size of a finished piece after shrinkage (assuming you know the shrink rate of the clay body you are using).
 |
| Here is a picture of a shrink ruler next to a standard 12 inch ruler Different sides of the ruler show different shrink rates. The shrink ruler is one of my most used tools in my studio. |
Monday, June 4, 2012
Belle of the Sunflower Ball

Friday, May 25, 2012
Hit and Miss
I've been trying out new glaze combinations lately. Sometimes I get a hit and sometimes I get a miss. This last kiln load, I had both.

I'm loving the results with the blue and green combo of the pot on the left and not really loving the other green and violet results of the pot on the right. I'm thinking a thicker outer layer might yield better results. Looking for a hit.

I'm loving the results with the blue and green combo of the pot on the left and not really loving the other green and violet results of the pot on the right. I'm thinking a thicker outer layer might yield better results. Looking for a hit.
Wednesday, May 23, 2012
Clay Totems Poles
.jpg)
.jpg) It's been so wonderful to see all the amazing art projects that are coming out of the classrooms these days. I'm especially happy when I see clay projects since it's what's near and dear to my heart. Tonight the school had their annual "Art Walk" where each class gets an opportunity to display an art project that they created during the school year.
It's been so wonderful to see all the amazing art projects that are coming out of the classrooms these days. I'm especially happy when I see clay projects since it's what's near and dear to my heart. Tonight the school had their annual "Art Walk" where each class gets an opportunity to display an art project that they created during the school year.My third grader's class has been studying Northwest Coastal Native Americans. I decided to do a project that related to this. I checked out a number of books from the library to share with the kids. There were some great images of different animals that were carved into the poles. We learned about tradition of totem poles and the stories the Native Americans told with them. Then we had each child create one section out of clay - incorporating the traditional Native American shapes into their pieces. I displayed them in groups for the Art Walk. I love how creative the kids were with the animals that they each made. It was an ambitious project for third graders, so I was really pleased with how well they turned out.
One interesting thing that we learned was the man who did the carving on the low part of the totem pole (the low man on the totem pole) was usually the most gifted carver in a tribe. The upper parts of the totem pole were not as easy to see, so they were typically carved by the apprentice and less experienced men.

.jpg) It was a little tricky to figure out how to display the final pieces, since they all were individual sections. I rolled slabs and had the kids use Pringle potato chip cans as a form, so they are hollow. Each piece is about 10 inches tall and has a hole in the top and the bottom so they could be layered on a wooden dowel (note the dowel at the top of the pole - poking through.). The challenge was to figure out how to anchor the dowels so they would be secure enough to hold the totems without tipping over. SISU Bill to the rescue.
It was a little tricky to figure out how to display the final pieces, since they all were individual sections. I rolled slabs and had the kids use Pringle potato chip cans as a form, so they are hollow. Each piece is about 10 inches tall and has a hole in the top and the bottom so they could be layered on a wooden dowel (note the dowel at the top of the pole - poking through.). The challenge was to figure out how to anchor the dowels so they would be secure enough to hold the totems without tipping over. SISU Bill to the rescue.He recommended filling buckets with water after I told him that I was considering cement or rocks. Water is cheaper and much easier to manage, for sure! He cut up a 1" x 4" into smaller pieces of wood that were the width of the bottom of the bucket. Then he drilled partway into the wood to seat the dowel. The dowel was attached with a screw. He drilled holes into the bucket lids and we slid them onto the dowels. (You can see the pieces in the back of my van before they were assembled.) Then we attached the lids to the water filled buckets, covered them with plastic table cloths and created the display.
It was a really fun project to do with the kids - plus I learned a lot about totem pole carving and its history!
If you are interested in doing this project and need more details, please send me a message at mkanz@frontier.com.
Tuesday, January 10, 2012
Eat the Frog
“Eat a live frog first thing in the morning
and nothing worse will happen to you the rest of the day.”
-Mark Twain
I like this quote for all kinds of reasons. I can put off those things I don't want to do - repeatedly. If I "eat the frog" first thing - just get it over with - then the rest of anythine else I do all day is easier to do.
 |
| Ceramic Frog - Too "crunchy" to eat. |
Monday, January 9, 2012
Rudolph - Drive by Shooting Victim
 |
| Poor Rudolph. He's been shot at - twice. Do you think the hunter got coal in his stocking? My kids say, "YES!" |
Sunday, January 8, 2012
My favorite part of the day
 |
| Rainy Day Rearview Mirror Finding the Rose in the rainy day Thorn on 1/5/12 |
 |
| "Toto, we aren't in Kansas anymore," exclaims Dorothy as she lands at the Emerald City Port Entrance. Follow the torn up brick road (viaduct), she sings as she wonders about the tower with Mermaids above the clocks. Perhaps she's about to try her first double tall skinny with no foam latte. My FPOD on 1/6/12 - Getting to go into the city for the day - lunch with SISU Bill and flawlessly nagivating my way through the crazy viaduct and tunnel construction zone to Seattle Pottery Supply. |
Last night, my oldest son called for the "Favorite Part of the Day" at dinner. He said his FPOD was the breakfast of Voget's sausage and scrambled eggs that I'd made for him that morning. My kid's call the sausage "Christmas sausage" as we have a large order of it shipped up from Hubbard, Oregon annually at Christmas. It's a real treat for them and it evokes so many sense memories of Christmas' gone by for me. Now that the house has risen from their sleep this morning, we are enjoying the last of the Christmas sausage. Not to be enjoyed again, until next December.
I love hearing what those FPOD or RAT moments are for each of the kids and SISU Bill, as it's often a window into their days and their perspective.
Last night I said my FPOD was waking up before everyone and reading a great book in the quiet of the morning with a hot cup of coffee.
I've historically been a night owl. Ask anyone who's lived with me over the years. I like to stay up late and sleep in. I think it's a family trait, as most of my family likes to do the same. I remember staying up to watch the "Tonight Show" with my dad or siblings in the summer time when I was a kid.
As I get older, I'm discovering that I really do like waking up early so I can enjoy the quiet moments in the morning before everyone gets up. The kids are finally old enough to enjoy sleeping in. Gone are the 5 am surprise wake ups or the shouts of "it's seven zero zero" crackling through the baby monitors, letting us know that the time limit of having to stay in their cribs had been spotted on the glowing numbers of the digital clock. I used to relish every extra minute that I could sleep in.
I guess it's symbolic of some sort of parenting milestone, that I now enjoy waking up before the rest of the house and watching the northwest grey skies turn a lighter shade of grey.
Friday, December 16, 2011
Coming Out of the Weeds
I've been in the weeds for the last couple of weeks with a custom order that was timed tight even under the best circumstances. I was humbly reminded that there are so many opportunties for things to go wrong with ceramics. I typically pride myself in avoiding potential problems given the experiences I've had over the last 20 years.
Sadly, experience didn't serve me well this time around, as I lost over HALF of a 60 piece custom pie plate order with two different disasters. Frankly, it kind of makes me sick to even quantify it that way.
I lost a kiln load of plates when they literally exploded into a million little pieces when the pre-heat cycle on my kiln didn't run. They were scheduled to "pre-heat" at 180* for 12 hours before ramping up to a bisque fire. The pre-heat removes any extra moisture from they clay and prevents pieces from cracking or even worse, exploding. Read the "Rose and Thorn" entry for the resulting images from the explosion that happened over Thanksgiving. I have no desire to re-post that sad image.
After suffering a loss of 20 some plates, I needed to crank it up fast since I was back to the beginning on the order.
We've had one of the coldest and driest Decembers on record here in the Seattle area, which means low humidity. Normally, dry weather is a cause for celebration around these parts. Typically, having pots dry too fast is not a problem here, as we are famous for our wet, rainy and humid weather patterns. It was so dry last week, that I lost 9 plates to cracking while drying. *sigh* I had made 5 extra plates just in case I suffered some problems. Never did I imagine I would lose 9 out of a batch of 26 plates. In my sleep deprived state, this was my low point! *sob*
Fortunately, I'm coming out of the weeds and the end is in sight. My family is happy, as they've gone through all their socks and underwear. Laundry and Christmas - here I come!
Sadly, experience didn't serve me well this time around, as I lost over HALF of a 60 piece custom pie plate order with two different disasters. Frankly, it kind of makes me sick to even quantify it that way.
I lost a kiln load of plates when they literally exploded into a million little pieces when the pre-heat cycle on my kiln didn't run. They were scheduled to "pre-heat" at 180* for 12 hours before ramping up to a bisque fire. The pre-heat removes any extra moisture from they clay and prevents pieces from cracking or even worse, exploding. Read the "Rose and Thorn" entry for the resulting images from the explosion that happened over Thanksgiving. I have no desire to re-post that sad image.
After suffering a loss of 20 some plates, I needed to crank it up fast since I was back to the beginning on the order.
We've had one of the coldest and driest Decembers on record here in the Seattle area, which means low humidity. Normally, dry weather is a cause for celebration around these parts. Typically, having pots dry too fast is not a problem here, as we are famous for our wet, rainy and humid weather patterns. It was so dry last week, that I lost 9 plates to cracking while drying. *sigh* I had made 5 extra plates just in case I suffered some problems. Never did I imagine I would lose 9 out of a batch of 26 plates. In my sleep deprived state, this was my low point! *sob*
 |
| Nine Cracked Pie Plates |
Fortunately, I'm coming out of the weeds and the end is in sight. My family is happy, as they've gone through all their socks and underwear. Laundry and Christmas - here I come!
Monday, December 12, 2011
Early Morning Potting
I've been burning the candle at both ends too much lately.

 Things I am currently grateful for:


- heat from the kiln in an otherwise heatless studio
- cordless phone and headsets
- liquid bandages
- good coffee
- audio books
- This American Life Radio Archives
- iPod, laptop and other technology to keep me from getting too lonely
- good friends and family who call to chat while I'm working
- a sister who brings food, help and her support
- a very sweet hubby who is willing to put on his "mom hat" to help with homework, dishes, cooking, etc...
Wednesday, November 30, 2011
Happy Accidents and the Accidental Turtlist
I'm a big believer in happy accidents as evidenced by the examples below in my ceramic happy accidents. I'm still trying to find the "happy" in the kiln disaster I suffered over the weekend. :-(
Twin Frog Pot - This is one of my “happy accidents”. This pot flew off the wheel while I was trimming it. It severely dented the rim on one side so I dented in the other side of the rim to match it up. Then I added the frogs to the sides and voila – the twin frog pot was born.


Accidental Turtlist - This is another one of my “happy accidents”. While trimming a large bowl, it flew off the wheel and hit a large metal coat rack. It severely dented the rim on one side so I looked at it and decided it looked like the hole in a turtle shell where the head pops in and out and ta –da – the accidental turtle was born – AKA the Accidental Turtlist. He now lives in my entry way and smiles at me as if to remind me of “happy accidents” that can come my way, if only I chose to look for them.


Twin Frog Pot - This is one of my “happy accidents”. This pot flew off the wheel while I was trimming it. It severely dented the rim on one side so I dented in the other side of the rim to match it up. Then I added the frogs to the sides and voila – the twin frog pot was born.


Accidental Turtlist - This is another one of my “happy accidents”. While trimming a large bowl, it flew off the wheel and hit a large metal coat rack. It severely dented the rim on one side so I looked at it and decided it looked like the hole in a turtle shell where the head pops in and out and ta –da – the accidental turtle was born – AKA the Accidental Turtlist. He now lives in my entry way and smiles at me as if to remind me of “happy accidents” that can come my way, if only I chose to look for them.


Tuesday, November 29, 2011
Rose and Thorn
At dinner most every night, we go around the table and share our "rose and thorn" from the happenings in our day. This was clearly my thorn. The picture is worth a thousand words.
 The pre-heat on my kiln failed - so sadly, I lost a batch of pie plates for a custom order with a tight deadline. *sob*

Monday, September 5, 2011
The Close of Summer
Labor Day weekend represents the "Close of Summer" for most people. It seems no one told the weather around the Seattle area, though. We are looking at a forecast of the upper 80's this week - which is warm for this area. Not that we're complaining! We had a terrible spring and almost no summer sunshine until August, so this is a welcome thing.
The kids are back in school and I've been throwing, rolling and carving up a storm in the studio. I've been working on some new looks over the summer. It took me a while to straighten out some issues with crazing, pinholes, and other issues with some clear glazes this summer. Thankfully, I've figured it out and I'm moving ahead with producing the new pieces. Everything is drying so quickly with this weather, I've got to work quickly. I'm excited to get the new work photographed and posted on Etsy so I can see what people think of them.
I was reminded that it's the Close of Summer with this fun treasury that some of my tumblers are featured in. Cheers!

The kids are back in school and I've been throwing, rolling and carving up a storm in the studio. I've been working on some new looks over the summer. It took me a while to straighten out some issues with crazing, pinholes, and other issues with some clear glazes this summer. Thankfully, I've figured it out and I'm moving ahead with producing the new pieces. Everything is drying so quickly with this weather, I've got to work quickly. I'm excited to get the new work photographed and posted on Etsy so I can see what people think of them.
I was reminded that it's the Close of Summer with this fun treasury that some of my tumblers are featured in. Cheers!

Friday, May 27, 2011
2nd Grade Inspiration
 |
| The Ferocious Lion |
I've had a busy season of children's art projects. One of my favorites was a pinch pot animal project I did with a group of second graders. I always love to see how creative the kids get when I give them a general assignment. This lesson was to create an animal using a pinch pot a base. Here are some of my favorites. I love being inspired by 8 year olds!
 |
| Yellow Duck |
 |
| "Fly catching Frog (the bowl is its tongue)." |
 |
| "Kitty Love" |
 |
| Howling Kitty |
 |
| "Oink!" |
Subscribe to:
Posts (Atom)