Wednesday, August 1, 2018

Shooting the Moon - My Dad's End of Days

Last September I was contacted by a reporter for the local newspaper, The Woodinville Weekly.  She was interested in writing an article about my ceramics business, Shoot the Moon.  We made arrangements for a phone interview and I shared some photos with her.  The following is the resulting article.

I was able to get a copy of the article sent to my parents shortly after it was published. My dad, Joe Tyler, had been battling Parkinson's like the quiet humble hardworking man I've always known him to be.

Barb, one of my Dad's sweet full time caregivers, sat with him and read him the article.  At the end of the article I shared where the name of my business came from - from my dad's shared love of playing cards, the game of "Hearts" in particular, where "Shooting the Moon" means you try to take all the tricks -  you take a risk and go for it.

Dad's health was on a slow steady decline and these were the end of his days.  He wasn't able to speak at this point, but Barb told me that his eyes brightened, he smiled a little and chuckled a bit when he heard that he had inspired the business name, Shoot the Moon.  This was something I had never shared with him, until that moment. 

Joe Tyler, passed quietly at home just a few weeks after this.  One might call the timing of this coincidental.  Instead, I like to think of it as serendipitous.


In Memory of Joe Tyler and his love of Shooting the Moon in Hearts. 


Here is a copy of the article that ran on October 3rd, 2017.  My dad passed on October 20th, 2017.
I miss him. In his honor, I will continue to Shoot the Moon creatively in my life and in my work.


·         03 Oct 2017 06:17
·         Written by Kirsten Abel, Features Writer
“One cool thing about clay is that even if you think you’re not creative, you usually can make something,” said Melanie Kanz, the owner of Shoot the Moon, a Woodinville-based pottery studio. “People surprise themselves with that they’re able to do.”
Kanz makes and sells her own pottery and also teaches wheel throwing and handbuilding classes to adults and kids.
“I love sharing that experience with other people,” she said. “People come up with things that I would never think of.”
Kanz also teaches classes for kids in which students make mugs, pitchers, and other items. (Photo by Melanie Kanz) 

If you aren’t already a potter, clay is sometimes a difficult medium to try out. The equipment required can be extensive and costly. You might need a pottery wheel and you definitely need a kiln. With a class like Kanz’s, students can gain access to both without having to drop a couple thousand dollars.

Aside from her at-home classes, Kanz also teaches an afterschool workshop at Bear Creek Elementary School sponsored by the school’s PTA. There, she teaches handbuilding skills to kindergarteners through third graders.
“I think with the way the curriculum has changed, art and creativity experiences are just so much more limited,” Kanz said. “It gives kids a chance to be creative.”
There’s a permanence to the things kids make in a clay workshop, Kanz said. Clay items like mugs stand the test of time better than drawings or paintings.
“I’m sitting at my desk right now and I’m looking at a mug my daughter made my husband for father’s day when she was six, and a little bowl my son made for me when he was four,” said Kanz. “Those are treasured objects.”
In Kanz’s handbuilding classes at her studio, her students make functional items like mugs and also decorative pieces like yard art.
“I did a birthday party for someone who was turning 70 and we made yard totems, bird baths, turtles,” Kanz said. “For kids we do other types of things like snowmen, tiles for the wall, or mugs.”

Melanie Kanz, owner of Shoot the Moon, in her Woodinville pottery studio (Photo courtesy of Melanie Kanz)
Kanz first took up pottery to keep her sanity after having three kids in less than three years. “It was kind of my outlet,” she said.

She originally learned the craft in the 1990s by taking continuing education courses at Bellevue Community College. “I loved it. I would go do that every Tuesday night or so,” she said.
Later, when she and her husband moved to Sacramento and had kids, she found a local potter in the area and started taking classes at her studio.
“That’s where things really took off for me,” Kanz said.
The family moved back to the Woodinville area about 10 years ago, and Kanz has been making pottery and teaching her own classes ever since.
“I find it really relaxing. There’s something about the tactile feel of the clay,” she said. “I like being able to take something that starts off really raw and turn it into something else.”
The name of Kanz’s studio, Shoot the Moon, is inspired by her father. 
“My dad was really big into playing cards growing up. He loved the game of hearts,” she said. “When you shoot the moon in hearts, you take a risk. You go for it.”
Students paint decorative clay pieces they made in one of Kanz’s workshops (Photo courtesy of Melanie Kanz)
Check out Kanz’s work to purchase on Etsy at etsy.com/shop/ShootTheMoon and look for her upcoming fall and winter classes at Facebook

Sunday, January 31, 2016

Textured Collage Tile Class

Here are results from the textured collage tile class that I taught during January at Shoot the Moon Studio.  The tiles turned out beautiful!  If you are interested in being added to the mailing list for class notifications, please send me a message.


Friday, June 26, 2015

Kids Pottery Classes - Summer 2015


Kids Pottery Classes - Summer 2015
 
Registration is open for Kids Ceramics Class - Summer Session 1
July 6, 9, 13, 16 - 10am - noon
SESSION 1 SIGN UP/DETAILS

Registration is open for Kids Ceramics Class - Summer Session 2
July 20, 23, 27, 30 - 10am - noon
SESSION 2 SIGN UP/DETAILS

Contact Melanie Kanz at wekanz@frontier.com with questions.


Wednesday, June 24, 2015

Back in the Saddle

Life has taken a few detours for me personally the last year and a half. 
I'm happy to be back in my studio and creating again!


Monday, November 11, 2013

Kiln gods

Potters are supersitious when it comes to firing our kilns.  We create kiln gods to place on top of our kilns while firing to watch over our load and bring us good luck in our firings. My youngest son made the little Yoda-like god on the left many years ago. I love the ears!

Thursday, November 7, 2013

Show Preppin'

I've been hard at work prepping for two upcoming shows.


Sgraffito Plates and Platters


Sunday, July 28, 2013

Teacher Appreciation Ceramic Project

"Thank you for helping us grow!"

This past year, my youngest child had a great teacher.  It was her first year teaching, which had me feeling a little apprehensive at first.  She was replacing a wonderful teacher who retired unexpectedly, so she had BIG shoes to fill.  Fortunately, for us all, she was wonderful!  I was so impressed with how well she managed teaching a new curriculum and even more so, how she really taught the kids so much beyond the information in their textbooks.  She has great maturity and insight for someone so young and new to teaching.

At the end of the year, I was reminded of this when I compiled a photo book for her and had the kids answer a few questions about their year with her.  Among all the funny, sweet and thoughtful answers, there were a few that really stuck with me. 

When asked "What is the most important thing you learned in Mrs. Lockin’s class?", one child responded, "I learned from her that when you have a problem with someone you should go directly to that person to talk about it, and not talk about it to everyone else first. I learned it’s better if you are nervous to talk to the person to take a friend along with you for support. She taught me it’s better to talk a problem out with someone than to just talk to everyone else and get madder and madder." 

Wow.

As a parent, hearing a child say something like that speaks volumes.  She wasn't the only student saying things like that, either.  These days there is so often an over-emphasis on test scores, common core state standards, etc...  It was just so refreshing to hear what these kids in her class had to say.  They had learned some life lessons - some that people my age haven't even learned yet.  Don't get me wrong, there were a lot of answers like "Multiplying fractions, double digit division, etc..."  Clearly there was a lot of learning going on in her classroom - on all levels. 

So all that being said, I was extra motivated to coordinate something special for this teacher in appreciation for all that she did for our kids this year.  While she was at a year end teacher appreciation lunch, we secretly made leaves for a tree out of clay.  We cut the leaves out with a leaf shaped cookie cutter.  Then the kids carved their names into one leaf and decortated extra leaves with leaf patterns.  The kids used a dull pencil to carve into the clay.


The leaves were cut out of clay using a leaf shaped cookie cutter. 
We bought a "memory box" type of frame at Aaron Brothers and had one of the other mom's in the class paint the tree trunk.   The leaves were attached with E6000 adhesive, along with a "plaque" with the teacher's name, class detail, school and year. 

It was a fun and relatively easy project that the kids enjoyed doing.  I think she was very touched when it was given to her in appreciation for all she did during the school year. 

Saturday, April 27, 2013

Mother's Day Gift Pendants - Classroom Project


This week I spent the day with a long time friend, Joanne.  We had a wonderful time enjoying the sunshine and each other's company.  She said she was willing to help me out with anything I had going on with Shoot the Moon, so I took her up on it.  She jumped right in and helped me make up some samples to use for a Mother's Day project for a 4th grade class. 

Porcelain pendanat samples before bisque firing.
 
It was such fun to sit, visit and get creative with our little clay pendants.  We rolled porcelain clay to about 1/2" thickness and the used tools and metal cookie cutters to cut our our shapes.  The textures were created using various materials:  rubber stamps, tools, shells, etc...  I even used the bottom of my daughters Converse shoe to create the basket weave imprint on the flower on the upper left.

I have various hole cutting tools, but I've found straws really work the best for these kinds of projects.  I like them because they always leave the best holes in wet clay - you get a really clean edge on both the front and the back, which I don't always get with a metal tool.  It's particularly important to have a smooth clean edge on the back of these, since they might be laying against skin when they are worn as a pendant.

Completed pendant with black cord and silver bead
Teacher Tip:  Normally, I have kids write their names and the year on the bottoms or backs of pieces for identification and nostalgic purposes.  Usually I have the kids use dull pencil or the wood end of a small paintbrush to "write" their name with in the clay when it's soft.  Since I'm trying to avoid creating a potentially scratchy texture on the back of these pendants, I think we'll be using a Mayco glaze pencil for their names.  The trick will be to keep track of what each child's piece looks like until it's through the bisque firing and they can put their name on it.  I'm planning on putting their name on a small piece of tape and taking a quick photograph to identify each piece. I typically use my phone to capture quick images of things like this. Here is an example of this.
I've made the mistake before of thinking the kids will recognize their pieces a week later.  Sometimes they don't - especially when some of them look similar. 

These will be a gift that will have a "life" - which is one of the things I really love about making clay projects with kids.  Mom's will keep these pendants and hopefully wear them for a long time. 

4th Grade Finished Mother's Day Gifts
 If you read this and try the project out, I'd love to see comments and/or a photo!

Update:  I've heard for many of the mom's that received these pendants and they LOVE them.  It really was a simple project that had great results. 

Tuesday, December 4, 2012

Nothin' Like a Little Heat...

There is nothing like a "little" heat to bring out the color in ceramics.  Glazes are amazing.  I always marvel how a ceramic piece is transformed once it's been glazed and fired. 
To be completely honest, "little" isn't really little - these were fired to 2232* F.

Here is a BEFORE image of a group of bowls:


Here is a AFTER image of the same group of bowls:


AMAZING!  Don't you agree?!?

Friday, November 30, 2012

Happy Valley Craft Fair

I'll be selling pottery on Saturday 12/1/2012 at the
 Happy Valley Grange in Redmond, Washington from 10 AM - 5 PM. 
Come on by if you are in the area.  I've got lots of new items and some fun sgraffito ornaments.

Tuesday, November 20, 2012

Opps!

Sometimes a picture is worth a thousand words! 

Saturday, November 10, 2012

Matcha Green Tea

Matcha tea in a Japanese style tea bowl-waiting for the water to cool to 175* F before adding it to the tea and whisking it up.
 I recently tried MATCHA TEA for the first time.  I'm in love.  It's amazing!  Matcha is a fine ground, powdered, high quality green tea.  The traditional tea ceremony in Japan centers on the preperation, serving and drinking of matcha.

I've been making Japanese tea bowls for matcha tea. 

To make matcha measure a heaping teaspoon of ground matcha through a small fine wire mesh sieve to break up clumps.  Sieve it directly in the ceramic tea bowl and add hot water (approximately 175°F).  Whisk the mixture to a uniform consistency, using a bamboo whisk called a chasen. Whisk it until there fine bubbles form on the top of the tea.  Make sure there are no lumps left in the liquid and no ground tea should remain on the sides of the bowl.  Don't linger - drink it quickly before the matcha settles too much.  It will make you feel amazing. 

A "chasen" - a bamboo whisk

I drank it up so fast, I almost forgot to take a photo of it before it was gone.  Yum! 

We get our organic matcha tea from Remedy Teas on Capital Hill in Seattle.  They sell the tea and supplies online and in their cafe - store.  They have a great offering of items that are made with matcha.   If you can, stop by and sit a spell. 
 

Monday, October 29, 2012

Studio Pal

I've been spending every spare moment working on inventory, samples and some custom orders.  I wish there were more hours in the day - as I'm working into the wee hours of the morning after everyone has gone to bed.  *yawn*  Thankfully my canine friend, Sequoia Boya, has been my studio pal. 

Waiting for glaze

My sweet boy - Sequoia


Thursday, October 25, 2012

The BUSY season

I've been working hard on custom orders, Etsy shop inventory, holiday craft show inventory and a retail opportunity. It's been fun and BUSY! 


soap dishes and sponge holders in progress
I've been working hard on custom orders, Etsy shop inventory, holiday craft show inventory and a retail opportunity.  It's been fun and BUSY!  Lots to juggle with a family and a business. 

A kiln full of samples waiting to be glazed

Friday, October 12, 2012

Latest Creations in Studio Shoes


Bowls, bowls, bowls!

Clay is messy. There is no way around it.  I have an old comfortable pair of Keen sandals that I wear in my studio while I work.  Over the years, they've acquired their own unique natural patina of clay and glaze splatter.  A sure sign of the onset of fall and cooler weather around here is my transition from sandals to socks with sandals.  The look is a definite "Glamour Don't"!


Friday, September 21, 2012

What's in a Name?

One of my kids had to do a little speech today on the meaning of his name.  When I look back on how we chose his name, it all seems unplanned to me.  We went to the hospital with three boys names (Jasper, Jackson or Finn) and two girls names (Zoe or Julia) picked out.  He came home with a completely different name with meanings that fits him so well now that we really know him: willful, desiring, protective, sheilding, taking someone else's place. 


It got me thinking about my given name Melanie Susan Tyler - meaning black lily tile maker.  Hmmm.  So fitting for me these days.  Certainly my parents didn't plan that.  I remember when I learned that my first name meant black.  It never made much sense to me.  Now that I think about it at this point in my life, I realize I've made tiles in many different colors, but I'm always drawn back to black as the base color for me to carve into.  Perhaps this urge has been with me since I was born. 

What does your name mean? Does it "fit"?

Monday, September 10, 2012

Firing - the magic of ceramics - a potter's "test kitchen"

I have a SKUTT 1227 Kiln.  It's an electric Cone 8 kiln with an electronic kiln controller that I typically fire to Cone 6.

In the past, I always have done test firings to reach Cone 6 at medium speed with no hold time.  After attending NCECA last spring in Seattle, I was inspired to finally start experimenting with my kiln's Ramp/Hold features.  I saw some amazing before and after results with glazes when controlled heating and cooling was used. 

I read an interesting article called "Glaze is Not a Rock by Carol Marians".  Read it for yourself to better understand what is happening to the molecules on the glazes as they are being heated up and then cooled.  She uses a great girls on a train analogy that I found helpful. 

Marians wrote another great article about cooling in Ceramic Arts Daily called "The Many Faces of Iron: An Exploration in Cooling".  It has some great images that show how varied a glaze can appear when cooled at different rates. 

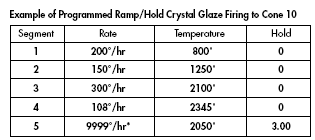
The kiln's Ramp/Hold mode allows people to design their own firing programs in different segments. Each segment can include temperature rate, end temperature and holding time. 
I'm still working on testing out my glaze combinations with different Ramp and Hold schedules.  Every potter's schedules will vary depending on the clay body and glazes they are using. 

Glaze firing clay is kind of like baking a cake. When you make a cake, you can bake it at 450 for 10 minutes or 350 for 22 mintues. In both cases, the cake will be "done", but the results will be very different. It's the same with glazes.  Using different firing schedules can product incredibly varied results in the glaze finishes. 

For me, this is the fun part.  It's kind of like working in a test kitchen with different recipes.  Only you can't eat the results - perhaps just eat off of them. 

Example of a Controlled Cooling Schedule.
 *Note that 9999 on a Skutt Kiln program represents the default for the maximum heating or cooling rate.  This will vary depending on the kiln, how packed the load is, the air circulation and the room temperature. 
 I find that in the dead of winter or peak heat of the summer heating and cooling rates can really vary for me, as my studio space doesn't have a heating or cooling system.


Monday, September 3, 2012

Shrinkage

I'm talking about clay shrinkage, not the George Costanza "I was in the pool" type of shrinkage. (One of those words that will likely live in pop culture for the generation of people who tuned in to Seinfeld every week.)

In fact, the shrinkage that occurs with clay firing happens because of extreme heat, not cold.  When clay is fired, the moisture is removed from the clay making it hard.  The higher the temperature the clay is fired to, the stronger it becomes.  Each piece is fired twice, one time for bisquing and then again after the glaze is applied.  Most of my finished pieces are fired to Cone 6 on the Pyrometric Cone Scale which is about 2232* F.  Yes, that's HOT!

Every clay body has a different shrink rate.  Most of the clay bodies I work with have about a 12% shrink rate.  While that might not sound like a lot, it sometimes is surprising how much it really is once a piece is finished. 

A before and after image of two mugs to show 12% clay shrinkage. 
The mug on the left is completed.  The mug on the right is leather hard -it has not been fired at all yet. 
Once the mug on the right is fired twice, it will be the same size as the mug on the left. 
I remember when I first started throwing and I'd make something that seemed really tall or big.  It was so disappointing to see the pieces after firing when they'd shrunk up so much.  Something that had seemed so tall and big at first, didn't seem that way in the end. 

I use a product called a "shrink rule" to help me cope with clay shrinkage.  Often customers want a specifically sized finished piece.  The shrink ruler helps eliminate a lot of the guess work that would normally occur when trying to estimate the size of a finished piece after shrinkage (assuming you know the shrink rate of the clay body you are using).
Here is a picture of a shrink ruler next to a standard 12 inch ruler
Different sides of the ruler show different shrink rates.
The shrink ruler is one of my most used tools in my studio. 
Next time you see a really large piece of pottery - think about how much bigger it was when it was created.  It'll seem even more impressive!

Monday, June 4, 2012

Belle of the Sunflower Ball


I always am fascinated with themes that people come up with for Etsy Treasuries.  Sunflowers are a hot theme right now, it seems.  This long sunflower platter of mine keeps popping up left and right on treasuries.  It's the belle of the ball right now.

Friday, May 25, 2012

Hit and Miss

I've been trying out new glaze combinations lately.  Sometimes I get a hit and sometimes I get a miss.  This last kiln load, I had both. 

I'm loving the results with the blue and green combo of the pot on the left and not really loving the other green and violet results of the pot on the right.  I'm thinking a thicker outer layer might yield better results.  Looking for a hit.